Showing posts with label DIY. Show all posts

Saturday, February 26, 2022

DIY Restoration Hardware Finish: RH DIY Paint Hack with Ikea Tarva Dresser


Whether you have recently purchased a home, or have been making updates throughout your existing space, you know the prices of furniture is through the roof and coupled with incredibly long wait times for delivery thanks to the global supply chain crunch. 

We all love and want the Restoration Hardware look, but sometimes we do not want to spend well into the thousands for each piece of furniture. There are definitely splurge vs. save opportunities when decorating, but if you have a little creativity and knack for DIY, you can transform simple pieces from retailers such as IKEA into something that looks expensive and high-end at a fraction of the cost with an IKEA Restoration Hardware hack. 

Restoration Hardware IKEA Hack - DIY RH Finish with Tarva Dresser


For my most recent IKEA Restoration Hardware hack, I used the Tarva dresser.  The goal of this project was to create a modern looking dresser that resembled the Restoration Hardware Weathered Grey Oak finish, but did not cost $3,000+.

Why I picked the IKEA Tarva Dresser for this hack: The Tarva line from IKEA is actually made of solid wood, pine to be exact, and comes untreated so it is easy to transform in a number of ways. 

To achieve the Restoration Hardware Weathered Grey Oak, I used a simple process of overlaying 3 stains.

Materials:
  • Furniture of choice: I used the IKEA Tarva Dresser
  • Wood Putty: If you plan to use your own hardware to achieve a certain aesthetic, you will likely need to drill new holes on the cabinets
  • Fine Grit Sandpaper: I opted for a 220 to lightly rough the surface before applying stain
  • Stains: To achieve a weathered oak look, you will need 3 stains. I used the following colors from Varathane: Weathered Oak, White Wash, and Jacobean.
  • Applicators/Rags: Brushes or rags to apply the stains and rags to wipe excess stain off


Restoration Hardware DIY Finish Process:

Start by lightly sanding all the pieces of the Tarva dresser to prep them for stain application. Note that I opted to stain the pieces before assembling the dresser as I felt this was easier to work with.

After sanding the surface, you will be applying the 3 stains in the order: weathered oak, white wash, and Jacobean as the final. Let each stain dry (~1 hour) before applying next layer.
  • Weathered Oak: apply weathered oak stain to bare wood. The stain should give a grey tint to the wood. Apply stain generously, let sit, and wipe excess off. The longer you allow the weathered oak stain to sit, the more grey hue will be visible
  • White Wash: After letting the Weathered Oak layer dry, begin to apply the white wash layer. Note: you may want to apply and wipe quickly to start and keep adding to achieve your desired level of lightness. The longer you let the white wash sit, the more more pronounced it becomes.
  • Jacobean: Once the white wash layer has dried, apply the final stain layer of Jacobean. This dark brown stain will help to tone down the lightness of the white wash, giving it that final touch for the Restoration Hardware look. Again, the longer you let this stain sit before wiping off the excess, the dark it will look
After applying all stains and allowing the piece to fully dry, you can finish your piece with the finisher of your choice - perhaps a polyurethane or furniture wax. 


To make my IKEA Tarva Dresser Hack a bit more modern, I opted to not attach the leg structure which helped bring the overall height down a bit, and selected square hardware pulls to put on the drawers.
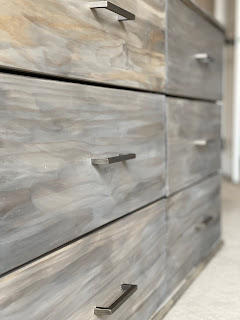


What I Learned and What to Expect:

I think it is important to go into any DIY project with the right expectations. When you own Restoration Hardware pieces and have them as a point of reference, it is important to remember that this is not a RH piece...there are going to be differences and your finish may not match exactly...and that's okay!

On the finish - you will get your "knack" down in terms of applying the stain and how long to let each one sit before wiping the excess to achieve the balance of tones you are looking for in your weathered oak finish, whether that be lighter or darker. To that end, you should expect to have some variation throughout your piece as it is hard to get every portion of the dresser exactly the same.

Hardware really takes it to the next level and ties it all together!

If you are ambitious, you can likely get through all the staining in one day if you have the space to lay out the pieces, however, I would plan on staining for ~ 2 days before assembling. 

Monday, March 21, 2016

Bar Cart Idea for your Apartment


A bar cart is a great addition to any apartment or space, becoming the go-to after work or the hotspot during a party. When it comes to a bar cart, look for something that matches the style or aesthetic of your space and has enough functionality to meet your bartending needs. If you are in an apartment, space is probably at a premium. What I like most about this bar cart is its tiny footprint yet big impact in terms of storage space.

If you are looking for a low-cost bar cart option that is very DIY, check out the Ikea Raskog Utility Cart. At $29.99, it is very affordable and the metal construction makes it sturdy enough to hold all your glassware. I liked the Raskog cart as it has a modern feel that matched the aesthetic of my space.  Additionally, the rolling wheels make it easy to move around during any events you may be hosting. 


Bar Cart Essentials:
-Your favorite libations: store them on the top shelf and arrange for an artful look
-Bar Tools: I recommend getting a strainer and jigger at minimum...so you are prepped for any cocktail recipe!
-Cocktail shaker
-Glassware
-Ice Bucket

I store my glassware on the lower shelves along with any miscellaneous items that I might use less frequently. Add fun towels to the cart that compliment your kitchen or space. Do you have a bar cart in your space? I would love to hear what you keep on yours in the comments below!


Sunday, June 28, 2015

DIY Refreshing Peppermint Foot Scrub


Summer is a time for sandals and flip-flops and running around barefoot at parties and picnics. Along with all that foot exposure can come some not so pretty feet. If, like me, your feet take a beating, especially in the summer, this peppermint foot scrub is a great way to treat your feet while feeling refreshed at the same time.

This scrub is very easy to make- I made my batch in under 5 minutes! The recipe utilizes peppermint essential oil which has an energizing, refreshing scent that I love.

Peppermint Foot Scrub:

1 cup Salt- It is up to you whether you want to use a coarse sea salt or a more gentle table salt depending on the intensity of the scrub you prefer.

1/4 Cup Coconut Oil


5-8 drops Peppermint Essential Oil *


Bring the coconut oil to a melted consistency, add in salt, essential oil, and mix well. Store your scrub in a glass jar in a cool place. 


*Note: I recommend using only the highest quality Youngliving Essential Oils. Learn more about essential oils, how to purchase, and how you can save 24% on all your future essential oil needs!

Monday, April 27, 2015

DIY Lemon Sugar Scrub


I have recently been using a lot more natural products in my daily regime from food to skincare. Once you read realize just how many chemicals are in some of these things, it can be quite scary! I do not always have the latest and best skincare products stocked in my medicine cabinet, however, some times it is nice to exfoliate or have a great scrub.

My Lemon Sugar Scrub recipe is not only easy (it is ready within minutes and can be made on a dime) it is also completely natural and effective. I find that spring and summer is a great time to exfoliate as my skin my be peeling from the sun or covered in chlorine/sunscreen when at the pool or beach. The below recipe is quick, easy, and also inexpensive making it a great idea for gift giving or Mother's Day as well.

Lemon Sugar Scrub:

1 cup Sugar- I use organic, raw sugar which is more corse, providing a more intense scrub. Use the sugar of your choice

1/4 Cup Coconut Oil

5-8 drops Lemon Essential Oil

Optional: lemon zest


Start by melting the coconut oil in 10 second intervals until it has become liquid. Be sure not to overheat as this will melt the sugar when added. Add in sugar and essential oil. Note: if you want a more intense lemon scent add 10 drops essential oil. Stir together and add optional lemon zest...enjoy!


This scrub is very refreshing. I love to do it in the morning as the fresh lemon scent is invigorating first thing in the morning! Be sure to package your finished product in glass jars only as essential oils cannot be stored in plastic.


Note: I only recommend using Young Living Essential Oils. Learn how to purchase and how you can receive a 24% discount on all your orders!
Related Posts Plugin for WordPress, Blogger...