Whether you have recently purchased a home, or have been making updates throughout your existing space, you know the prices of furniture is through the roof and coupled with incredibly long wait times for delivery thanks to the global supply chain crunch.
We all love and want the Restoration Hardware look, but sometimes we do not want to spend well into the thousands for each piece of furniture. There are definitely splurge vs. save opportunities when decorating, but if you have a little creativity and knack for DIY, you can transform simple pieces from retailers such as IKEA into something that looks expensive and high-end at a fraction of the cost with an IKEA Restoration Hardware hack.
Restoration Hardware IKEA Hack - DIY RH Finish with Tarva Dresser
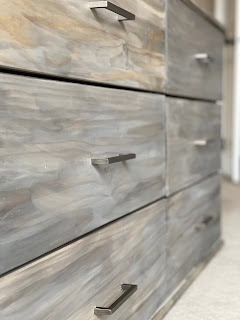
For my most recent IKEA Restoration Hardware hack, I used the Tarva dresser. The goal of this project was to create a modern looking dresser that resembled the Restoration Hardware Weathered Grey Oak finish, but did not cost $3,000+.
Why I picked the IKEA Tarva Dresser for this hack: The Tarva line from IKEA is actually made of solid wood, pine to be exact, and comes untreated so it is easy to transform in a number of ways.
To achieve the Restoration Hardware Weathered Grey Oak, I used a simple process of overlaying 3 stains.
Materials:
- Furniture of choice: I used the IKEA Tarva Dresser
- Wood Putty: If you plan to use your own hardware to achieve a certain aesthetic, you will likely need to drill new holes on the cabinets
- Fine Grit Sandpaper: I opted for a 220 to lightly rough the surface before applying stain
- Stains: To achieve a weathered oak look, you will need 3 stains. I used the following colors from Varathane: Weathered Oak, White Wash, and Jacobean.
- Applicators/Rags: Brushes or rags to apply the stains and rags to wipe excess stain off
Restoration Hardware DIY Finish Process:
Start by lightly sanding all the pieces of the Tarva dresser to prep them for stain application. Note that I opted to stain the pieces before assembling the dresser as I felt this was easier to work with.
After sanding the surface, you will be applying the 3 stains in the order: weathered oak, white wash, and Jacobean as the final. Let each stain dry (~1 hour) before applying next layer.
- Weathered Oak: apply weathered oak stain to bare wood. The stain should give a grey tint to the wood. Apply stain generously, let sit, and wipe excess off. The longer you allow the weathered oak stain to sit, the more grey hue will be visible
- White Wash: After letting the Weathered Oak layer dry, begin to apply the white wash layer. Note: you may want to apply and wipe quickly to start and keep adding to achieve your desired level of lightness. The longer you let the white wash sit, the more more pronounced it becomes.
- Jacobean: Once the white wash layer has dried, apply the final stain layer of Jacobean. This dark brown stain will help to tone down the lightness of the white wash, giving it that final touch for the Restoration Hardware look. Again, the longer you let this stain sit before wiping off the excess, the dark it will look
After applying all stains and allowing the piece to fully dry, you can finish your piece with the finisher of your choice - perhaps a polyurethane or furniture wax.
To make my IKEA Tarva Dresser Hack a bit more modern, I opted to not attach the leg structure which helped bring the overall height down a bit, and selected square hardware pulls to put on the drawers.
What I Learned and What to Expect:
I think it is important to go into any DIY project with the right expectations. When you own Restoration Hardware pieces and have them as a point of reference, it is important to remember that this is not a RH piece...there are going to be differences and your finish may not match exactly...and that's okay!
On the finish - you will get your "knack" down in terms of applying the stain and how long to let each one sit before wiping the excess to achieve the balance of tones you are looking for in your weathered oak finish, whether that be lighter or darker. To that end, you should expect to have some variation throughout your piece as it is hard to get every portion of the dresser exactly the same.
Hardware really takes it to the next level and ties it all together!
If you are ambitious, you can likely get through all the staining in one day if you have the space to lay out the pieces, however, I would plan on staining for ~ 2 days before assembling.


No comments:
Post a Comment